
Origami butterfly
By Mrs M. Ramsay and Roxanne Ramsay (Aged 7½)
Origami is the Japanese art of paper folding.
In this article we'll give you all the instructions you'll need to turn a flat piece of paper into a beautiful butterfly!
Before you start
It is important that you know how to do two important folds that are referred to in the instructions below:-

Instructions
- Start with a (biggish) square of paper. Make a valley fold horizontally across the paper. Then make mountain folds along the diagonals. Corners A and E will make the front wings, and C and D will be the back ones.

- Bring corners A & C together. Then bring corners B and D together. Tuck in the horizontal creases to make a triangle shape.

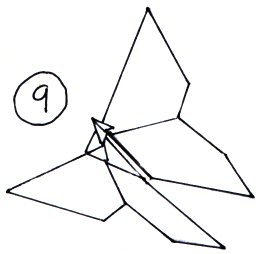
- Fold down corners C & D to the right-angled point of your triangle.

- Make a valley fold across the triangle.

- Fold flaps C & D to the front. Fold the outside edge of each flap towards the center to allow the flaps to lie down flat. (These are the back wings).

- Make a mountain fold at E. Then make a valley fold to form a little point peeking up from behind your model (This will be the head).

- Fold the butterfly in half using a valley fold. Bringing wing A to wing B so that the butterfly is side on.

- Valley fold along wings A and C near the head to make the body. Turn over your model and do the same on the other side with wings B and D.

- I hope you now have a butterfly. If you pinch the body the wings flap a little.
Why not colour in or decorate the butterflies you've made.
This article was originally printed in the Bug Club Magazine Vol 7, No 6, December 1999